Wednesday, April 01, 2015

Exhausted from testing ....Let's make Pi Skylines

     Once again, testing season is here.The way we scheduled testing in my building was to take one test per day and then see all of our classes for shortened periods of 30 minutes. We were able to do the paper pencil test this year as our school does not have the infrastructure in place to test the entire school on computers yet. The district I teach in has over 40,000 students so to have computer access for so many students is quite a task to undertake. So after the third of five days of testing, my students didn't want to do anything. They were exhausted and you know how kids are when you change the schedule. That third day was the Friday before Pi Day and we were having our annual Pi Day competition during the lunch periods and they were excited about that. I had all kinds of fun activities planned but the kids were too crazy so I know how to calm them down. We color. Yes, in 8th grade sometimes we color. It always calms them down. I found this activity at  What do we do all day  on how to make a Pi skyline. This was a perfect activity to help the kids relax and it fit the theme of the day. All you need for this activity is graph paper, rulers, a list of the numbers of Pi and colored pencils. I put on some music and we all just relaxed and colored. Everyone was happy and smiling. What could be better than that and it was a great way to end the week. I love how the pictures turned out and it puts some needed color in my classroom.
     

I love how these turned out!

A close up of some of the pictures.

This one is my favorite.

A night scene.

Very colorful.


This one looks like a sunrise. Nice!


If you have some ways that you add math and art into your classroom, I would love to see it.


Til next time,
Jan


And now for something completely different - Monarch Butterfly Habitats

      I love gardening and getting into the garden during the summer is something I look forward to all year. Flowers are my passion and my hubby plants a large vegetable garden for us. I spend hours a week in my garden working in it and enjoying my flowers. Everyday when I walk into school, I hate looking at the front of our building because it doesn't have flowers anywhere. It's just plain out boring. There actually use to be beautiful flowers in front but someone pulled them all out. UGH! So to remedy this situation, Donna, a science teacher at my building and I are starting a gardening club with the kids. What fun! While I was trying to decide what we should plant, I ran across interesting pins on Pinterest explaining how to plant butterfly gardens, specifically Monarch Butterfly gardens. I've always wanted to plant a butterfly garden and when I read that Monarch Butterflies are endangered I knew I needed to plant one. Well actually, I will be planting two, one at school and one at home. (Shhh, don't tell my husband, he doesn't know yet that he is going to be building it for me. I just plant he does the rest. LOL ) The nice weather cannot get here soon enough for me.

 Here is some information I read on the National Wildlife Federation site:

  • The Monarch Butterfly has declined 90% in the last twenty years. 
  • One-third of the summer habitat has been destroyed mostly in the Midwest. (That's my area.) 
  • Milkweed is the only plant that the Monarch caterpillars use and it has declined because of the use of pesticides. 
I feel I can do a small part to help these beautiful creatures. So I've decided to share our journey creating the garden with all of you. I will be able to find math to talk about during this project and hopefully lots of awesome pictures. I'll keep you posted. 
     
Check out my pinterest board on  Monarch Butterflies. 

Gorgeous

If you are interested in starting your own Monarch Butterfly Garden go to any of the following sites for more information.


I'll keep you posted on how it is going. We have our first meeting tomorrow. Wish us luck.

Til next time,

Jan

Thursday, March 26, 2015

Does the upside down division method work for everything - just about :)

    The upside down division method can be used to teach just about everything. OK, I exaggerated a little, but I use it to teach kids prime factorization, simplifying algebraic fractions, greatest common factor, least common multiple, and factoring polynomials. Teaching students one way to solve so many different types of problems makes it much easier for them to remember. I am sure that most of you are already very familiar with upside down division. If you are not, it is the cake method many people use for prime factorization, but upside down. See Sarah's post to explain the birthday cake method. The only problem I have with the cake method is if I don't start in just the right place the problem goes off the paper.This is not an issue with upside down division, you can keep dividing all the way down to the bottom of the paper.

    Initially, I teach this when finding prime factorization of numbers. Here is a foldable for their interactive notebooks. I needed to review divisibility rules with my kids before this lesson. 


I love prime factorization because it helps the kids review their multiplication tables with smaller numbers. They should know them but so many of my kids don't.  :(


 I like how this method doesn't take up as much space as the factor trees do.


I have started making more of my notes fill in the blanks. It saves so much time. However, I don't like to have them all written for them.


   I do a quick review of short division with the kids. Many of them have never seen this before.

     We use this method again when simplifying algebraic fractions.


 Here's a foldable we used for simplifying fractions.


I usually draw a fraction bar between the numbers. I forgot to do that on this foldable.


    Before we do upside down division with fractions, we have written fractions in expanded form and simplified to find the answer. They are familar with the exponent rules already.


     Next I use this with Greatest Common Factor and Least Common Multiple. 


I originally had this foldable as one foldable, but I decided to cut it in half and have a separate page for GCF and LCM. The students have already learned the other two methods for finding GCF. They have also covered exponent rules 
as well.


Instead of circling the common factors, the students place a large G over the numbers. It is an added visual for the kids.


Upside Down Division for LCM is also called the Ladder Method. I never knew that until I started writing this post. You learn something everyday:)


On LCM the students draw a large L around the numbers as an added visual.


     Lastly, we factor polynomials using Upside Down Division. 


My Pre-Algebra students always have difficulty with this topic. Using the Upside Down Division makes it so much easier for them to understand.

     
Download documents from this post here:

I am so happy to have all of this written and saved in one place. I litterally had to search everywhere to consolidate all the pieces. I hope there is something new for you to use.

Til next time,
Jan :D

Sunday, March 01, 2015

The evolution of an Interactive Notebook page for Graphing Systems of Equations


     February has been a crazy month. My hubby had a big birthday, so family and friends were in town and we were very busy. PARCC testing is right around the corner for my kiddos at school and I am trying to get them as prepared as possible. (This is another post that I do plan to write soon.) February just got away from me and I can't believe that I had only one post this month.
     I started pulling together ideas for my interactive notebook pages on graphing systems of equations, not thinking that this would be a big deal to make. Was I wrong. I just can't seem to get the page to fit and the foldables aren't lining up. So I thought I would let you see my evolution of this page.
     I decided to use a matchbook foldable instead of the flat organizers I've been using lately. Then I tried to put all the information on the page.


     The information just wouldn't fit on the page.


     This has all the information that I wanted on the page but it was too crowded for my liking, so I went back to the drawing board.


 Still too crowded. Wasted another piece of paper. UGH!


   What a mess!!!!


Maybe a different foldable will work. Which one to choose?


I can't get this foldable to line up correctly front to back. The lines are off. 
  FRUSTRATING:(


     I finally became so irritated with using up my pages in my notebook that I made a copy so I could make mistakes on the copies. If you would like to use these blank pages here is a copy of. 

     Tomorrow is another day. I was hoping to get this post finished in February but it has now turned into 1:30 am, March 1st, so I will try again tomorrow. Who knew one page of a notebook could make me so crazy.

Til next time, which will hopefully be tomorrow,
Jan


Wednesday, February 04, 2015

Slope interactive notebook pages

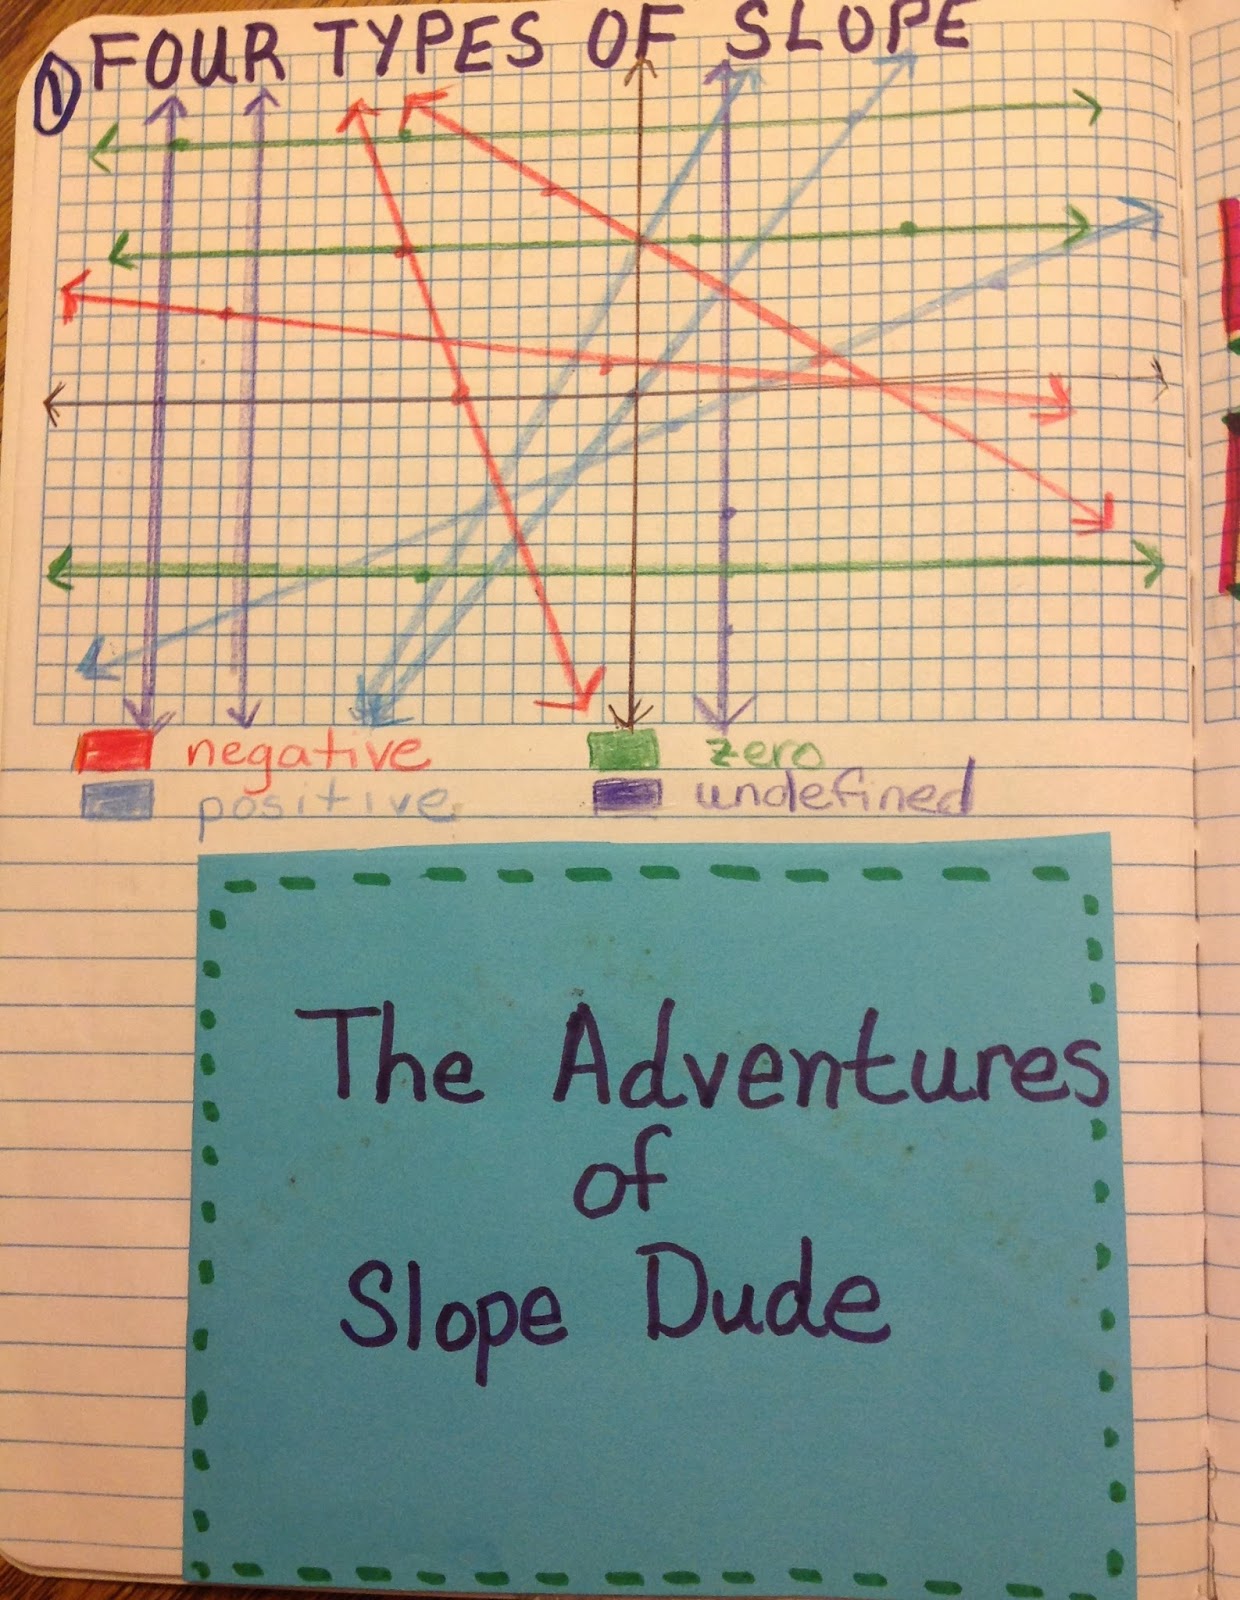
Here are some of the Interactive Notebook pages on slope that I have used with my Algebra students. I'm changing my foldables and notes to go along with our new notebooks so everything is smaller than before. It's killing me that on some of the pages I am covering up the graph paper with notes and not utilizing it for graphs. Also, our xerox machine cannot print on colored paper and I am having to live with boring white paper! UGH! That just means lots of colored pencils and markers are a must! All in all I think the notebooks are turning out great. 

This is going to be a post with lots of pictures of our interactive notebooks but not much commentary. Life is so busy there isn't much time to write. I will probably come back and edit this post later so I can add more comments because there is just so much to say but until then, enjoy the pictures.


I totally stole these from Sarah at math equals love. Go see Sarah's post where she has great pages she has used with her students. See what the inside of the slope dude foldable looks like. So easy to make. Doesn't everyone love Slope Dude? The students had to draw 3 postive slopes, 3 negative slopes, 3 slopes of zero and 3 undefined slopes for the top part of this page.


Another page from Sarah. I changed the red color to gray because it was too close to the purple and hard to tell apart.


I have changed many of my foldables into small graphic organizers 
to fit into our new notebooks. I really never heard the phrase, "slope triangles," before but I am seeing it in several posts and assessments so I added it to this page.


I should have said the x increases by the same value and
the y increases by the same value. My kids would think they
both have to be the same.


The left page x and y intercepts definitions are from Sarah again at math equals love. What would I do without Sarah????


I love having the graphs available at the top 
of the page but I it means shrinking my foldables. 
This one is basic but it turned out OK.


Inside of the intercept foldable.


The students picked 4 more sets of points to complete on the 2nd graph.


Here are some of the pages. I will download the rest soon. Promise:)

Saturday, January 24, 2015

Rally Coach (Kagan Structure) with word problems

This morning I woke up and decided to sit, drink my coffee and catch up on reading some of my favorite blogs. Justin at Re-Learning to Teach had a post where he reflects on some of the very same issues I have with many of my 8th grade Pre-Algebra students. I started to leave him a comment but it was very long so instead I have decided to join Justin's "Whine and Cheese" party here on my blog. 

Most of my posts usually involve lessons I am using in my classroom or reflections on training I have completed. However, I have failed to reflect on the behaviors of many of my students and strategies I may take to improve their behavior. Many of my 8th grade Pre-Algebra students are exactly like Justin's students. The majority of my students do not complete homework when it is assigned and are not getting the practice they need to learn the skills that are being taught. We have been working on writing equations from word problems which is difficult for many of my students especially my second language learners. We used my most used graphic organizer, (see previous post HERE), and I decided to use a Rally Coach Kagan Structure in class to give them the practice they needed in a fun way.

I am fortunate that my school has been receiving Kagan training throughout the year as part of our School Improvement Plan. So far this year we have had three full day training sessions. The entire school has been using these structures with our classes and it has been a great experience. 

If you are not familiar with the Rally Coach Structure I will try my best to explain it to you. First of all, the students in our classrooms are in groups of four, sometimes a group of three if there is an odd number of students. They have shoulder partners and face partners for group work. See this post on Kagan Structures for an explanation of the group set-up.

For the Rally Coach, students work with their shoulder partners. The explanation given from the teacher is important because social and group expectations are a huge part of Kagan. First, you explain what you want the students to do and the behavioral expectations for the group. Next, you let the kids know what behaviors you don't want to see and lastly model the expected behaviors. 

Here is what a Rally Coach looks like:

  • One of the partners is given a question that has only one correct answer. That's easy to do in math. 
  • There is also only one piece of paper and one pencil for the pair. 
  • Partner A solves the problem explaining their reasoning to Partner B. 
  • Partner B coaches Partner A if they need help and also affirms the work they are doing correctly. 
  • If the answer is not correct, Partner B coaches Partner A to arrive at the correct answer. 
  • Once they agree on the answer, the teacher checks it, and gives positive affirmations to the students or suggestions on what to change.
  • When the pair has the correct answer the teacher hands a new problem to Partner B. 
  • The students switch roles and repeat the process.
That was a very very short explanation of what we learned in one of our sessions.


 I knew the majority of the kids wouldn't do the homework so I took the homework questions and placed each question on different sheets of colored paper. I needed to have 16 copies of each question, one for each of the pairs in my room. The pairs were given only one whiteboard and marker and the partner who was doing the problem was the only one who could write on the whiteboard. When the students agreed on the answer they raised the whiteboard in the air, I quickly checked it and handed the next question to that pair. The different colored paper made it easy for me to keep track of what question I should give them next. I had a total of 10 questions and only a couple of pairs were able to answer all of the question in a 45 minute period. 

I am here to tell you I was amazed at how the kids behaved and stayed on task. All but one of my 100 Pre-Algebra students were actively involved. The one student just drew basketball courts when it was his turn. Another day, another story. Best of all, they all had the practice that I wanted them to have and they didn't have homework. Everyone was happy:)

I really like how we teach social skills along with the math that we do. I have seen an improvement in how the kids are reacting to each other in class. They are learning how to interact with each other in a positive way, how to give and receive affirmations and are learning a little more patience.

It was a fast paced period, good thing I wore my gym shoes that day. I will definitely use this strategy again. Let me know if you try this and how it works. 

Til next time,
Jan


Wednesday, January 07, 2015

More transformations interactive notebook pages


Happy New Year everyone! I started back to school on Monday with an in-service day that was our 3rd session of Kagan Structures training. (Another day and another post will fill you in on the details. All I can say is it is so worthwhile.) Today was the first day back with the kids and guess what? We have a snow, no really a cold day tomorrow with wind chills of -32 degrees F. Oh the fun of living in Chicagoland. Brrrr. I don't know how my friends up north do it. Hope that all of you are staying safe and warm.

Here are a few more pages that I haven't posted yet from the unit we just finished over transformations. I'm really in love with these composition notebooks that are 1/2 graph paper and 1/2 lined paper. So instead of foldables I will be doing pages utilizing the graph paper in the notebooks.    


I have these tables available to download at the end of the post. I did add the extra column on the files I have for you. 


Some of the students wanted to go back to the pre-image each time they did a new transformation. So we drew arrows from the previous ordered pairs to help them see what figure they were changing.


The students really loved doing their initials. What was great about it is they were all different and the copying was not an issue.


We didn't cover as much on dilations as I wanted because winter break started and it was the end of the semester. I will have to hit this a little more somehow before testing.


There was a post I read quite some time ago, sorry I don't remember who wrote it, about coloring with a purpose. Ever since I read that I try to make the colors that we use in our interactive notebooks be there for a specific reason, not to just make the pages look pretty. On these pages I coordinated the colors of the ordered pairs to the figures on the graphs. However, on this graph I mixed up the green and the pink colors. UGH.


Click here to download documents from this post.

Enjoy! Til next time,

Jan  
Related Posts Plugin for WordPress, Blogger...