This is my second year using my transformation project as an assessment and I love it! See my previous post here,transformation summative assessment, for all the details. The timing of this project couldn't be any more perfect as it falls the week before winter break. My kids were so busy and engaged while they worked on this. I had music playing and we all had a great time.
The key to this assessment is that it never leaves the room. I've debated long and hard about whether to post the students pictures because students could google and find this to copy. (Just to let you know, there are errors in all of these pictures.) I would love to hear your opinions about whether to post student work or not. As I said, the way I get around the copying is that this never leaves the room and they have to work on it while I am present. Even if they get ideas from other places, they still have to do all the work. With that said, here are some of my favorites from this year.
We had our winter theme. This student did all of her transformations from the pre-image.
There are all levels of difficulty in these pictures. I told the students to make a picture between 10 and 30 points, but not to go over 30 because that makes it too hard to finish in our 3 1/2 periods.
There were a couple of students who drew pencils and both were different.
I love these hats!
This student chose boxing gloves.
On this one you really have to look at the points to see what
the transformations are because it is so symmetrical.
This picture reminds me of a Dr. Seuss illustration.
The emoticons were very popular and hard to draw. This student worked so hard, and had to tape an extra sheet of graph paper to the back for her picture to fit, and then had graph paper with the plastic that wouldn't let her write on it. It was exhausting! She worked so hard I had to post it.
Another emoticons. They call them emo gees or emogees,
but I don't know how to spell that and either does spell check.
Nice candy canes, they ate some while they were working.
There is always a clown in every class and here he is.
His last transformation is not correct but he made me laugh
and was creative.
Hope you enjoyed these. Have a wonderful holiday season.
Hi everyone, I'm back! I have never been away from my blog for this long and I've missed writing so much. My last post was on August 20th and I try to write at least every other week which obviously hasn't been happening. The reason I've been gone is because I have a new prep which includes a new computer program that I needed to learn. Well, I finally feel like I am getting a handle on everything so I now have a little time to blog. There are 57 posts in my drafts box and I have so much to share:) My 8th grade Pre-Algebra classes are on an endless journey to learn everything they ever wanted to know about exponents. Right now we are learning how to solve multiplication and division problems written in Scientific Notation. I didn't have any luck finding foldables on this topic so I made my own. (I always like mine best anyway.) Here is the foldable I created for our Interactive Notebooks.
This was actually put together at midnight the day before I taught this lesson so the left side could be changed next year. I do tend to procrastinate sometimes.
The foldable turned out to be the perfect size for our composition notebooks. Love it!
Don't let the division tab confuse you. It is the tab for the next section even though multiplication problems are written on this page. You can always cut it off because there is another division tab underneath. I became frustrated trying to get everything to line up so I just left the tab.
Sorry, there's a grammatical error here. It should say only thenumbers are divided. Overall, I like how the foldable turned out. Hope you do too.
School has started! We had 3 days of in-service and PD last week. One of the best parts of the training is catching up with friends from other buildings that I have worked with over the years. My district is large with seven middle schools and five high schools. I've been on lots of committees and worked in three different buildings so there were lots of people to see. When I was talking to several people some of them asked me what an interactive notebook was and how to use it. This made me realize I would like to share in a little more detail how I use interactive notebooks in my classroom and what the first few days of class are like in my room. There are so many Numbers about Me projects out there and they are all great. I love Sarah's from Math = Love. It is short, which I need on the first day of class and an easy way for me to add color to my classroom. I start with a PowerPoint presentation about me. Numbers are on the screen and the kids need to guess why that number is important to me. It's a fun way to introduce myself to them. Examples are the number of years I've been married, the number of children we have, 13 the number of letters in my last name and so on. Then they fill out the numbers about me sheet. I put a few restrictions on the numbers they can use. They cannot pick their age or grade since they would all have the same number. We have 45 minute periods so by the time I go through PBIS tools, the PowerPoint and this activity the period is over. I collect them and get to know a little about each of the students and hang them up in the classroom.
This is from last year. Each class had a different color piece of paper for the Numbers about Meby Sarah at Math = Love. The kid friendly Math Practice Posters above the board are from the other Sarah at Everyone is a genius.
The next day the kids discovered what learning style they have. I love the Learning Stylessurvey from Sarah at Everyone is a Genius. I did however have difficulty downloading it so I decided to make it a foldable. Thanks Sarah for the very detailed post on how to use these in the classroom. Stop by and read Sarah's information and how she follows up with the students. This is a great way to help kids develop study skills that are personalized to how they learn. Both these pages are adapted from Sarah's post.
I always thought I was a visual learner so it was a surprise the see I was actually kinesthetic. No wonder I love foldables and INB's so much, they are hands-on activities with a lot of movement. I also NEVER sit while I am teaching so that was a big clue. The list on my thumb is not on the kinesthetic learner suggestions but I know it works for me so I added it. As a matter of fact I have lists that tell me what list to look at. I'm serious about that!
After the kids finished the survey we had them look at Sarah's (everyone is a genius Sarah) learning style suggestions for ideas on how they can use their learning style to help them improve their retention when they study. Now I want to use this information in class to help them as well. There will be more later this week. I'm excited to share how we start our notebooks and how the beginning pages work. The first week of school is crazy with everyday having PBIS tools to teach. (PBIS stands for Positive Behavioral Interventions and Supports. For more information go towww.pbis.org.) I will be doing much more next week. Thanks again to the two Sarah's. Without them I would never have started using Interactive Notebooks.
Last year, as part of our school improvement plan, all the teachers in my building participated in three professional development days with a certified Kagan instructor. We will finish the last two training sessions on cooperative learning this coming school year. If you ever have the opportunity to go to a training do it. It's amazing and so much more than just cooperative learning groups. The entire training is hands on and you participate as a student would in your class. You can walk into your classroom the next day and use structures with the kids immediately. Go toKagan onlineto get more information. The first thing I needed to do last year was to set up my groups. At the beginning of the year I started with random groups, which was fine for the first couple of weeks, but this year I am going to start immediately with heterogeneous groups. Our students take the MAP (Measures of Academic Progress) test three times during the year. I will have access to their spring MAP test scores from last year that will help me create the groups. You can use any test that you want, as the year went on I used pre-tests and formative and summative assessments as well. Kagan believes that groups of four students is optimal. Each group should have two boys and two girls. This isn't always possible so I do as many as I can and then make all boy or all girl teams. If there is an odd number of students in the class then there will be a group of five or sometimes two groups of three with the remaining groups having four students. I did vary this last year with a couple of students that were boys. They were non-stop off task students when with another boy so they were placed in groups of all girls. Those girls kept them in line and they definitely had better behavior to impress the ladies. (This was not a Kagan suggestion. Just something that worked for me.) To create my groups I needed my class rosters, the list with student MAP scores, a pile of index cards and colored pencils that match the colors of the groups.
On the top of the index card I placed the students name and their MAP math and reading score and if they were a second language learner. With my second language learners I place another student who speaks the same language if possible.
Next, I placed all of the index cards in order according to math MAP scores from highest to lowest. The I divided the index cards into 4 groups, HIGH, HIGH MEDIUM, LOW MEDIUM and LOW scores.
Each group has one of each level student. Take a card from each of the groups of index cards and you have your teams.
On each index card I use a colored pencil to mark the team the students are placed in. In my classroom I have different colored stars above each of the teams, yellow, green, red, purple, pink, orange, blue and salmon. By placing the colors on the index cards I can make sure that when I change groups the students aren't place with the same peers again.
When placing the students in the groups you have them seated like this:
LOW MEDIUM LOW
HIGH HIGH MEDIUM
The high student next to the low medium can help that student when they work as shoulder partners and the high medium can help the low student in their understanding. Also having students with similar levels across from each other helps them to feel comfortable with students who are closer to their levels when working as face partners. I always had these students sitting next to each other but staggered the arrangements in the groups so they couldn't figure out who was the low or high one in each team. Groups should be changed about every six weeks.
There are desks not tables in my room which works out very well. When they take assessments I have them move to rows. We practice this the first week of school. I also noticed when I lecture they didn't pay attention so now when I lecture I have them facing forward and not in groups. (I don't lecture too much but when I do this seems to work for my kids.) It will be interesting having students this year who know the Kagan structures and expectations. I can't wait to see how much better there participation and understanding is.
On a side note, one of the claims of Kagan is that their structures improve learning for all students because of the level of engagement involved. Last year my school had the highest gains of all eight middle schools in the district on MAP scores. Now I am here to tell you my school is always right in the middle. We have a 65% poverty rate with the majority of our students who are second language learners (which several of the other schools do not), and we never have the highest gains. The only thing we did differently was this training and all the teachers used these structures in their classrooms. Hmmmm... very interesting.
or Kagan Cooperative learning on Amazon. Chapter 7 of Kagan Cooperative Learning goes into great detail as to how form groups. Disclaimer: I am not a certified Kagan instructor. All of the information given are my thoughts and reflections of the training I attended. Til next time, Jan
I absolutely love this post from great maths teaching ideas for a trigonometry-pile-up. However, I don't teach trigonometry in my 8th grade math classes but I do teach Pythagorean Theorem. I decided to make triangle stacks that cover this topic. The first unit for my Algebra students is Pythagorean Theorem. It isn't a topic we usually cover in Algebra but the students are eighth graders and they will be tested on this material so we will cover it at the beginning of the year. Toward the end of the school year I will use this activity with my Pre-Algebra students as well.
Silly students, don't look for answers here. You will not find them as I don't post answers that can be copied. (The diagram is definitely not to scale.) The correct worksheet is the downloaded copy. It has the corrections. Sorry for the confusion. I need to update that picture one of these days.
All of the answers are integers so I may use this in conjunction with the Pythagorean Triple lessons that I will be doing with the students. Students will place numbers in each of the triangles starting at the bottom so it will be easy to follow their work. They willstart at the bottom of the puzzle to find answers and work their way up to the top triangle to find the missing side. I plan to have the students place this in their interactive notebooks.
I can't tell you how many times I made this diagram. I thought it was perfect until the area where the green, blue, yellow and purple triangles intersect. I was 1 cm off, Yikes! So I adjusted the picture and hope you understand what it means. All in all I am very pleased with how it turned out. It will be interesting to see how it works with the two different groups of students. My concern is that it will be too easy for the Algebra kids but too hard for many of the Pre-Algebra kids. I'll let you know.
Click here to download the Pythagorean Stacks worksheet. Hope you all are enjoying your summer! School starts in one month for us. Too much planning to do and so little time. UGH!
Here is another post that has been in my drafts since March. Oh my! Thank goodness I have summer to sit down and share these with you. Enjoy:) This was the first time I have taught slope triangles. Actually, and don't judge me, I've never given them any time in my curriculum. That changed this year as I decided to spend several days working with them in my Pre-Algebra 8th grade classes. We started our unit with Fawn Nguyen's awesome lesson using staircases to begin our discussion of slope. I know that Fawn used this with her 6th graders but it was appropriate to use with my Pre-Algebra classes. Here is the link toFawn's first of two postson this activity. Fawn goes into great detail explaining the questioning and student interaction. Take time to read her posts, they are awesome. Thanks Fawn! My students completed the worksheet in one class period. I'm hoping that next year we will spend more time with our discussions. I love the video that Fawn shared from the Utah Avalanche Center discussing the slope of hills and avalanches. We showed this at the beginning of class the next day.
Next we did an interactive notebook page on counting to find slope.
We drew slope triangles and labeled them.
Then they did the INB page below with their partners.
I probably should have added a vertical line on this page as well.
There were a few other activities that I will share in a later post.
Of course we watched Colin Dodds Slope video.
The kids love his songs and so do I!
It was worth spending this amount of time on slope triangles. It gave the students an added visual for finding slope that I know many of them need. I was happy with how much the slope triangles helped my struggling students. When they would hear the words slope triangle they knew exactly what they needed to do.
I'm cleaning out the drafts that I started so disregard the statement that I am still in school. You will see lots of posts like this in the next few days.
So much to do and so little time. It is nearing the end of the school year and I'm crazed!!!! This picture sums up how I feel right now. Our middle daughter is a first year high school science teacher and she asked me, " Mom is the end of the year always like this? I am so stressed and can't get everything done." I answered, "Yes sweetheart it is. Then June will come, you will sleep for one month and wake up in July and feel normal again."
(This has been on Facebook and I'm sure you've seen it.
I searched for the originator of this picture with no success.
I have no idea who created this so I can't give credit. )
So to save my sanity, I am going to post lots of odds and ends over the next few days. I literally have 50 drafts of bits and pieces of posts waiting to be finished. It's time to clean out that draft folder and start sharing. So here is the first one.
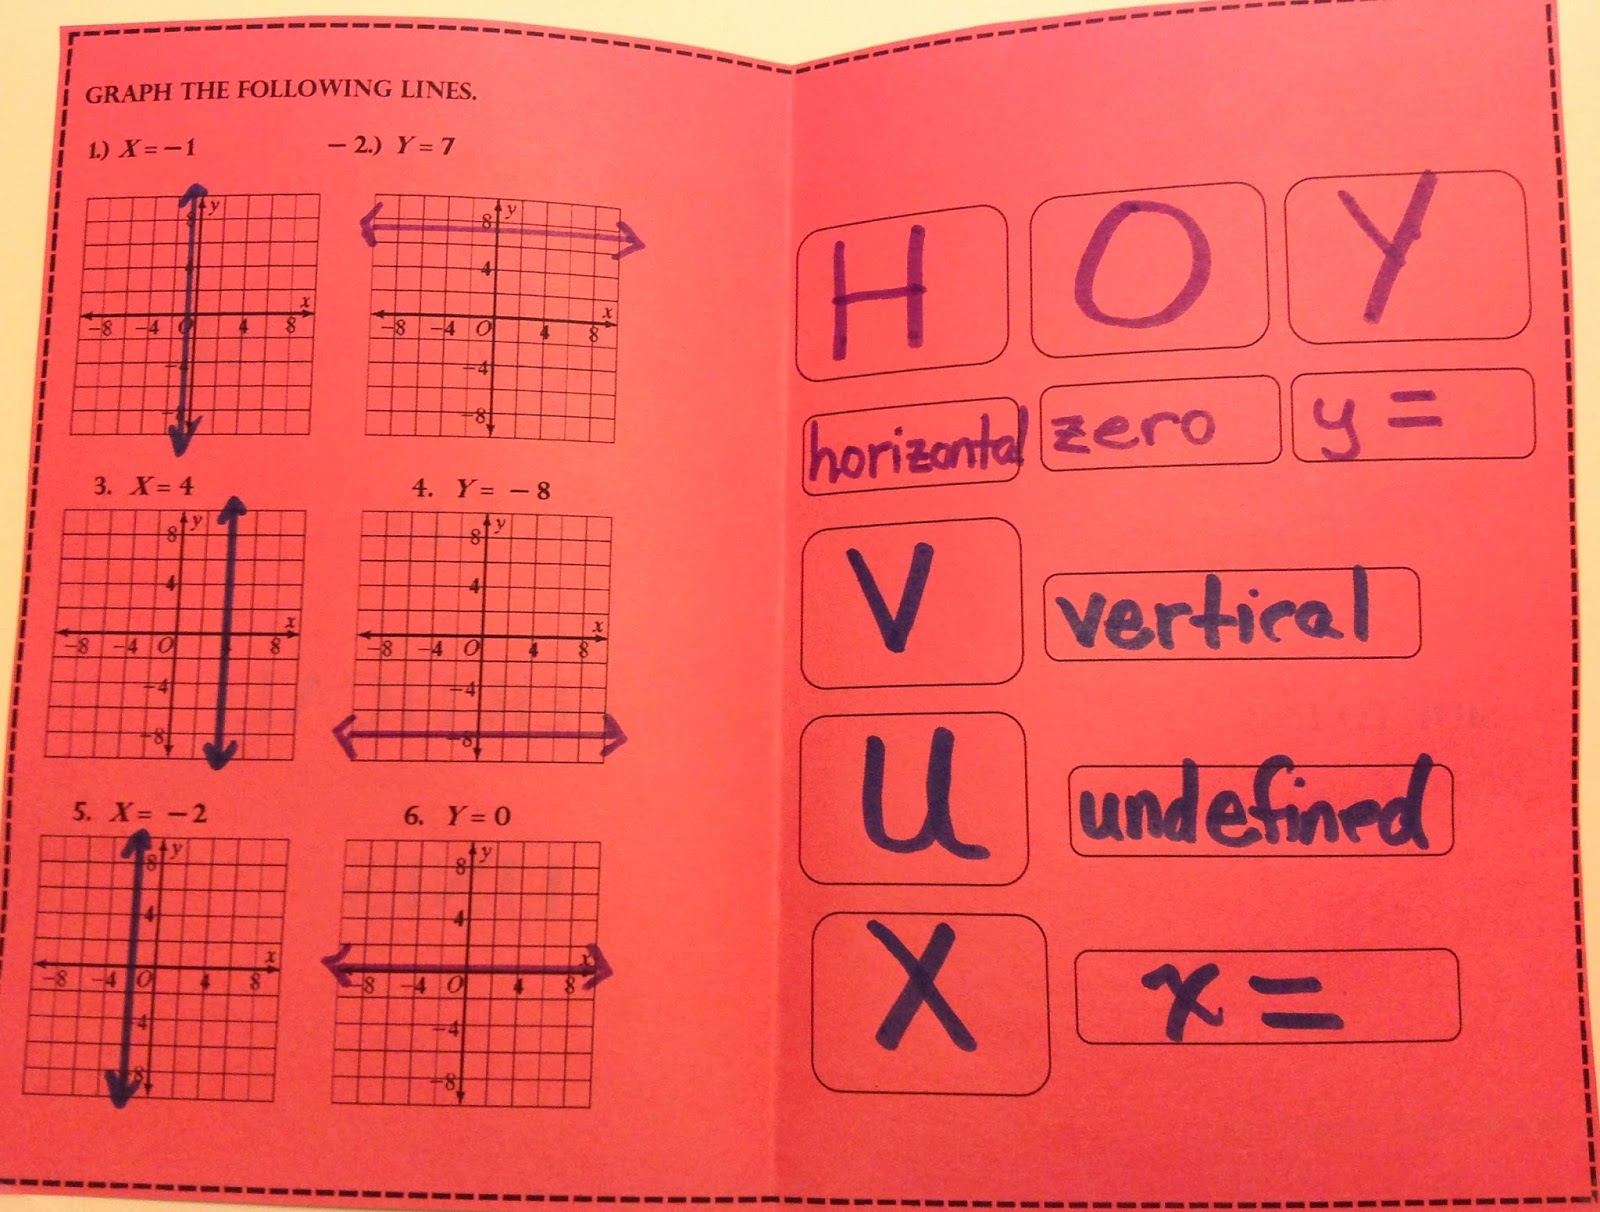
One of my first posts on this blog was my HOY and VUX graphic organizer. See original post HERE. This is an updated version made into a foldable. I think I like this one more.
I still have the HOY written horizontally and the VUX written vertically which is one aspect of the original that I really thought was helpful for the kids.
YES! Today was our last day of school and I am so exhausted. Not because of the craziness of the year but because the building is being painted this summer and we had to pack up our rooms. I usually leave posters on the walls, books in bookcases, have bulletin boards up before I leave, but not this year. I literally have 5-four drawer file cabinets filled to the brim with projects, worksheets, tests and quizzes. I had to place a couple drawers of each in boxes so the file cabinets wouldn't be so heavy. I also have one closet and two big cabinets filled with stuff. (A lot of this is math department supplies and I am the Lead Teacher who gets to store it all.) Thirty years of stuff. UGH! I envy my younger colleagues who have everything stored digitally. It's my goal to have everything saved digitally but having time to go through all of it, and sort, file, throw or scan everything is overwhelming. But I made a little progress today. I threw out 2 file drawers of materials on topics that are no longer part of the curriculum so it is a start. During my cleaning frenzy, I found a project a student completed five years ago that I use to do with the kids at the end of the year on circle graphs. I would count this project as a test grade, which now I would call a summative assessment. I love this project because it involves angle measures, percents, data collection, constructing circle graphs and of course coloring. I miss doing this unit. Sigh :(
Circle graph project
Directions:
You are going to create a circle graph that displays the
activities that you do in a 24 hour period. Everyone’s data will be different
and all the circle graphs will be unique to the person that completes it.
First, you will need to make a list of all the activities that you are involved
in over a 24 hour period and place them on the chart.
Next, you will write down the times that you are involved in those activities.
You will need to change the time to minutes.
Then
you will find the percent of the day that activity takes.
Then
you will change the percent to the degrees that it would represent in a
circle graph.
After
the chart is completed you will create your circle graph.
Use
the compass to draw a circle that has a radius of 3 inches on the
construction paper you have been given.
Cut
out your circle.
Now
draw your circle graph using the information on your chart using your
protractor.
Your
circle graph will need to be labeled with the activity and percentage on
each sector of the graph.
You
will need to color your circle graph as well.
You will be graded on neatness and how the circle graph is
displayed. I will check all of the computations and degrees and grade you on
the accuracy of your answers.
This will count as a test grade as this is a major project.
I got them started on some of the categories. Electronics and TV were separated so I could see the difference. I would probably group them together now as many kids watch TV on their IPADS or phones. Look at the homework section. I would say many of my kids don't spend that much time on homework. Sad.
I've learned not to post answers that can be copied.
I don't have a rubric but this is a copy of the grade sheet I gave each student. It would not be on a percentage basis if I were doing this today. We grade on a 4-point scale now.
I can't believe I had this in my files. Now I'm going to look for an awesome Weather Project I use to do about 15 years ago. We used newspapers, imagine that. LOL.
My 8th grade Pre-Algebra students have been working on our Pythagorean Theorem unit for a couple of weeks. Today when the kids walked into the room I turned on this short video byColin Dodds. Itold them to pay attention to the vocabulary in the song because they would be using it in today's lesson. We have been using this vocabulary all along but this gave great visuals as well as music to help them remember the words. I did add my input when the song said the two other sides, I asked, "What is the vocabulary word for those two other sides? The kids love all of Colin Dodds' songs.
Robert Kaplinsky has an amazing site and if you haven't seen it before you are in for a treat. One of the lessons that he has listed for the 8th grade Pythagorean Theorem Standard is, "How can we correct the Scarecrow?," from theWizard of Oz. I asked the kids how many of them had seen the movie. Only about half of my students had seen it. WHAT!!! I was shocked. Of course, they all wanted to watch it right then and there but no - not today. So we talked about the Scarecrow and how he gets his brain and tries to recite the Pythagorean Theorem but gets it mixed up. As I have told you before the majority of my students speak another language so I knew I would need a visual on this part of the lesson. I made a template for them to fill for this activity so they had a little direction. (The download is at the end of this post.)
We watched the Scarecrow and together wrote down what he said. It took about 4 times repeating the video to get the whole statement. Working in their groups the students needed to find the Scarecrow's mistakes, write them down, and correct what was wrong. I told them that I found 5 mistakes and challenged them to find them all. Believe it or not, you could hear crickets in the room (that means it was really quiet for my second language friends). They looked at me with big eyes as I walked around waiting for me to tell them the answer. Nope, that is not happening.
Me: "What is something that the Scarecrow said that was wrong?" Luckily the isosceles triangle was one that they could see right away so that gave them some encouragement. After a few minutes I heard isosceles triangle, hypotenuse, legs and so on. I told them I like the math vocabulary I was hearing.
After they found the mistakes they were to write down what the Scarecrow should have actually said.
Me: " No you cannot write a2 + b2
= c2. You need to write a statement using the math vocabulary we have learned in this unit." There was a lot of groaning at this point from many of them.
Here are some examples of the students work. Sorry if it is hard to read, they use mechanical pencils are light and difficult to read.
When the kids wrote down the quote from the scarecrow, I didn't write it, I only repeated it. Being a math person I just assumed that the students would know he was talking about "the sum of the square roots" not, "some of the square roots." I clarified that with my other two classes. I think that hypotenuse and hypothesis from science became a new word here. You will see how my kids struggled using the correct vocabulary for this activity.
So many students thought that some was a mistake and that sum was the correction. I think next year I will write out with them what the Scarecrow actually said.
We have been using the words squared and square roots all year. How can they not understand the difference? I had no idea this was an issue for so many of them.
Almost correct.
At the very beginning of the video clip the Wizard says he has his Thd, Doctor of Thinkology Degree. Many of the kids didn't understand the reference and believed it was a mistake and should be Phd. That was not something I thought about but it made sense.
The template I created was taken from one we used in the past for the extended response problems that were part of our state testing. It was called a 4 square template. The top left box is where the students would write, What I know. The bottom left was where they would show their Work, the bottom right is where they would Explain their work and the top right box would say, My answer is ... and they would circle their answer. It was a good template but we can't use it anymore because the students need to write their responses in paragraph form. Too bad, it was a great tool for them and I do use it for lessons like this.
We used the entire 45 minute period to do this lesson. One of my classes had to watch Colin Dodds video and extra 3 times to listen and look at the vocabulary again.
Another class was able to finish so I collected the paper and found "my favorite no." The next day I went over "my favorite no" with the other two classes as well. I use this quite a bit in my classroom. Watch the video from the Teaching Channel which explains "my favorite no" better than I ever could. I do believe they understood the difference between when to write squared or square root when we went over the favorite no's.
Last year I tried this lesson by just watching the video and it was confusing for my students. Having the kids write down what the Scarecrow said and doing this activity at the end of the Pythagorean Theorem Unit made a big difference over last year. There was still confusion on the difference between the vocabulary words square root and squaring a number. They knew the difference between the computations but not the words. I think having to struggle rewriting what the Scarecrow should have said was a great learning experience for them. I had fun watching them when they started finding the mistakes and how they were interacting in their groups. They did a great job. It was a GOOD DAY and you have to sit back and enjoy that when those days happen. I'm smiling.
Last year I spent so much time working on my Pythagorean Theorem unit and when it was finished I was pleased with the results. So I decided to just use everything from this unit again. I was looking at the Pythagorean Triple foldable and remember spending endless hours making it. I was surprised when I looked at it this year that I didn't like it at all! I wasn't happy with the wording, the way it looked or anything actually. Wow, I was so proud of it when it was posted. Anyway, I decided to update that foldable and make pages that will fit into our composition notebook. Although I'm still not thrilled with the final product it is better. The second page should be one large page and the wording on the last two pages is not the way I want it, but it's an improvement. Maybe by next year I will get a final copy that is perfect.
Most graph paper has centimeter grids. These composition notebooks and 1/4 inch grids. We couldn't measure in inches because the triangles would be too big. That is why I don't have any measurements listed on the paper. We made our first triangle a 3x4x5 grid triangle.
And of course, we reviewed slope of similar figures.
Coming back to a topic several times is benificial for my kids.
My students can't understand when you double the dimensions of a figure, you don't just double the area of the original figure. I wanted this lesson to review that with them.
I'm not at all happy with the wording of the last question. I have to work on that one.
I really do like this lesson and will be teaching it next week.
I will probably have an update of this update then.