 |
Click here for Henry Anker's, Magic Circle.I think Monday will be a good day to try this. Why not?I'll let you know how it goes. Wish me luck. |
Showing posts with label triangles. Show all posts
Showing posts with label triangles. Show all posts
Saturday, May 03, 2014
Coolest math foldable review lesson for geometry I've ever seen!
I have a confession to make. I am just exhausted at this point in the year and do not have one ounce of creativity left in my body. So I browse the internet looking for lessons others have prepared that I can use. I am getting ready to teach volume but need to do some review on the parts and area of a circle first. Lo and behold, I ran across the coolest lesson for folding a circle. It's Henry Anker's, measurement with the Magic Circle. Love, love, love this lesson. Henry has a PowerPoint for the kids to follow that shows the step by step process with questions for each slide. Making folds on a circle you create 10 geometric shapes. You also find the measurements, perimeter and area for them as well. This lesson has 40, yes 40 slides to it. I have to run through this one first myself a few times before I teach this to the kids. It will probably take my Pre-Algebra classes 2 full periods to complete the lesson. I really like the idea of the kids making the figures and discovering what shapes they have made. The kids will definitely be next to their partners for this one so they can help each other as we walk through the steps. I am going to have the students write the answers to the questions for each slide on paper or perhaps I can make a quick worksheet with the questions on it so they can just fill in the answers.
.

Friday, April 25, 2014
Geometry Star (Again)
Geometry Stars revisited
As promised here are some of the geometry stars my students made. I could post so many pictures because they turned out beautifully, but I concentrated on my 8th period class. They have turned in the most pictures to date. I am impressed with how beautiful some of them are. Below is the display of part of 8th periods pictures. Enjoy.
.JPG) |
I couldn't stand that this was not symmetrical so I changed two pictures around to make it look just right. Can you guess which two I moved? |

Nice dimensions.
 |
Love, love, love this one. |
 |
| Blue beauty. |
 |
| Nice patterns. |
 |
| Blue and bright. |
 |
| Red Starburst |
 |
| The green background looks great with this one. |
 |
| I love how you can see all the different types of triangles here. |
 |
| Another red background. |
 |
Gorgeous....The kids did a great job and my room looks awesome! I would love to see how others incorporate art into their teaching once in awhile.
Til next time,
Jan
|
Saturday, April 12, 2014
Make a Geometry Star
As I promised here are some of the geometry triangle stars that my students made. I'm not quite finished with the display but couldn't wait to show you some of the pictures my kids created. They loved this assignment and it fit in perfectly with our study of triangles. It's a great project to do on one of those crazy days right before a break or when they have been testing and need a break. This is available at Teachers Pay Teachers from Virtually Montessori and it is free. I loved this project and so did the kids.

 |
| One of my favorites. |
 |
| The colors of this one matched the background beautifully. |
 |
| Because the points were small the glue became an issue. I think I would use glue sticks next time. |
Til next time,
Jan
Saturday, April 05, 2014
Triangle exploration lesson
.JPG) |
| These students found the lengths they chose formed an obtuse triangle. |
.JPG) |
| These students formed a right triangle. |

As they worked they filled a sheet to to collect their information. Then looking at the sides that did not form triangles they wrote why they thought they didn't form triangles. There were some interesting observations like: "It just doesn't fit.", "It won't close.", and "they aren't long enough." It was a great visual for the students. On day two when we discussed this we actually lined the two shorter sides next to the longer side to show they were not greater than the third side. We also looked at sides that did form triangle and the two shorter sides were longer than the third side.They kids did a great job on this activity. Of course, you know they did want to start building towers. I do need to find a building towers activity because they would love it. Suggestions anyone?
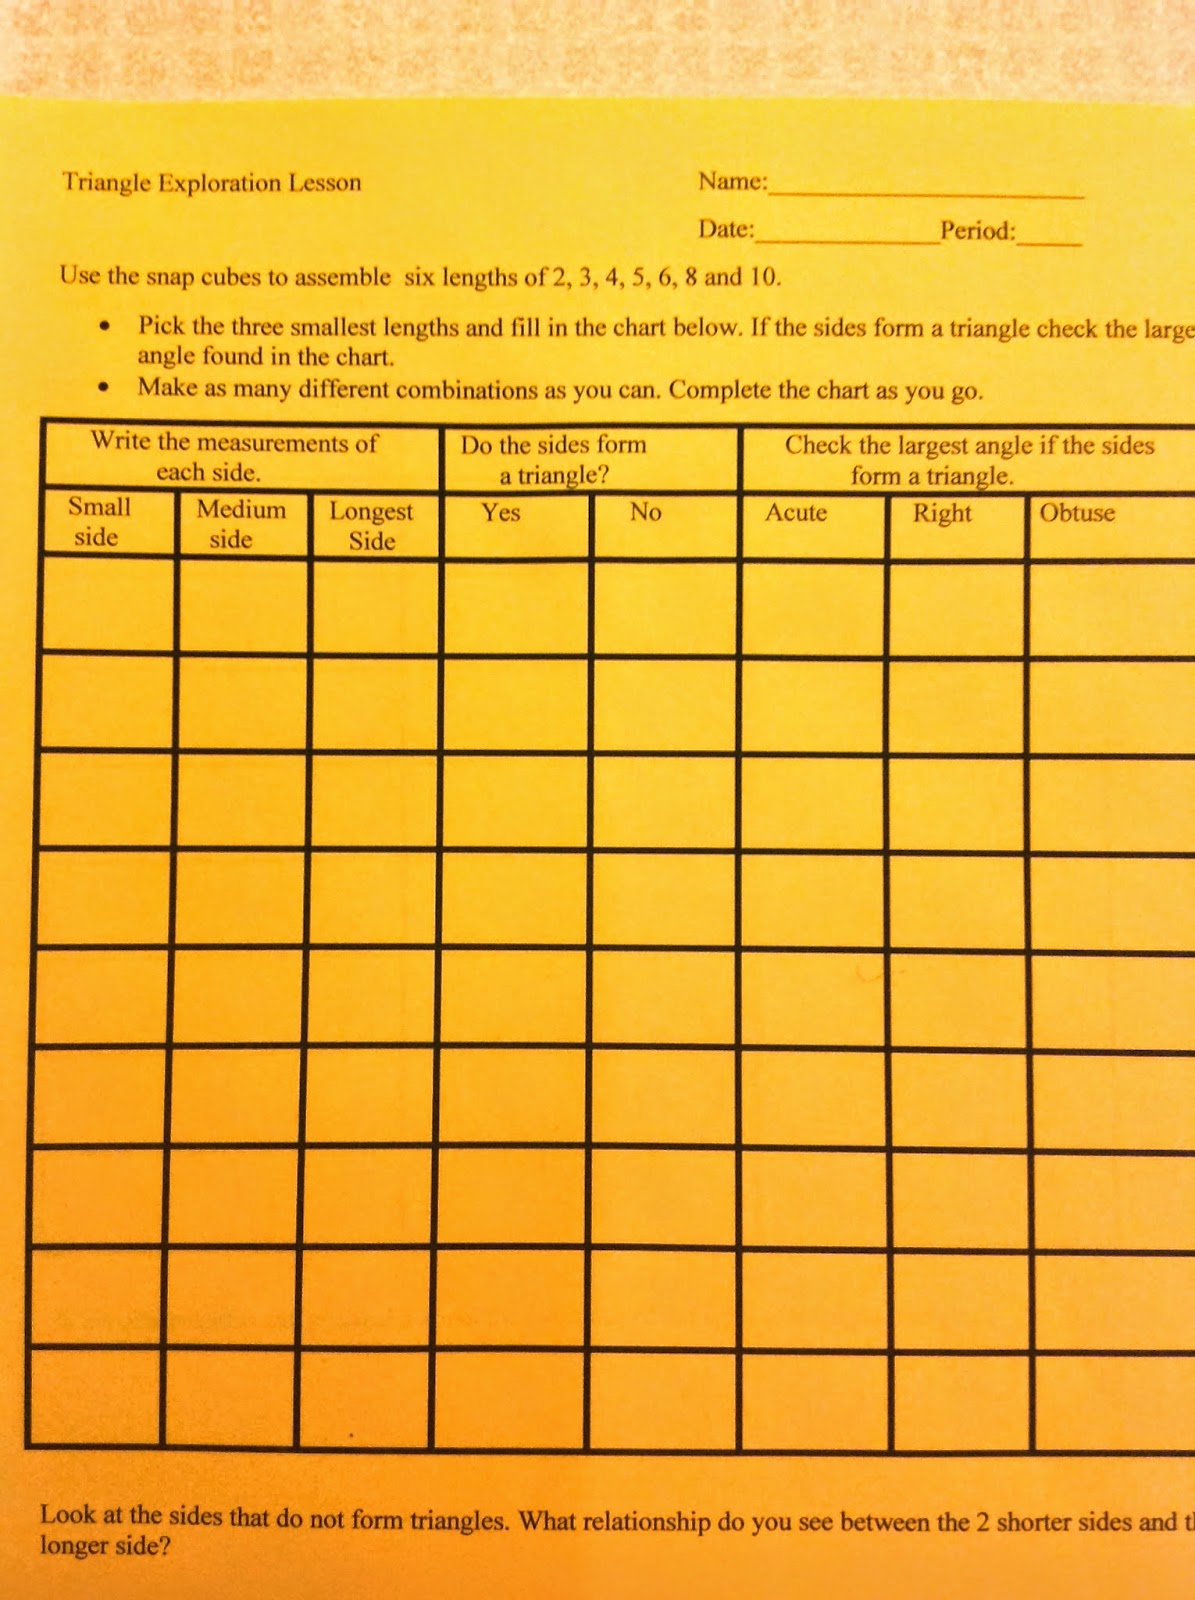

Click here to get a copy of the Triangle investigation sheets. This is adapted from
Alexander Sabatino, Jr's Picking Pythagorus Lesson.
Everything went well until "that class" came in. I don't know if you have one of these but I have one this year. They are challenging in every area you can imagine, yet I keep trying to do group work with them. What's the matter with me? Well anyway, one of the students came in, let's call him "T" and he quickly grabs the Tupperware and says he will pass them out. Before I can utter a word, he has eight Tupperware stacked in his arms and yes, you guessed it, he dropped them. All the snap cubes, 100's of them are all over the floor. At least "T" was busy for awhile picking them all up. Oh the joys of middle school.
This lesson worked well and the kids enjoyed it. It gave them an great visual for the triangle inequality rule. I will definitely be doing this again next year.
Til next time,
Jan
Saturday, March 29, 2014
A peek at my Pythagorean Theorem Unit
At last, my finalized Pythagorean Theorem unit. I feel like I have been working on this forever. I love all of the activities that I have found and it was difficult to narrow it down to the following lessons. Here is a list of the major activities that I am doing with my students starting next week. This is going to be fun!
Students will need:


And of course, Dan Meyer's 3 act, taco cart lesson. Check his site to see all 3 acts with questions and more. It is outstanding and the kids love guessing to see who will get to the taco cart first.
Pythagorean Theorem Investigation
I will introduce Pythagorean Theorem with the Starburst candy activity. I was inspired by Pam Lucken's video to use Starburst candies as a manipulative to form the sides of the triangles. I have seen the same project using other manipulatives as well. I just think candy will be fun. My goal is for the students to be able to discover the Pythagorean Theorem on their own. When they have finished the activity it will go in their interactive notebooks.
Students will need:
- A copy of the Starburst Triangle Investigation and direction sheet.
- A plastic bag with 340 Starbursts in each bag. (Maybe 350 to account for accidental eating.)
- A plastic bag with triangle measurement sides for the six triangles they will model.
- Paper, pencil and straightedge.
Click here for: Starburst triangle investigation and
Triangle Exploration Worksheet ( adapted from Alexander Sabitino, Picking Pythagorus.)
Directions for Starburst Exploration, Starburst triangles to measure pg 1,
starburst triangles to measure pg 2
Triangle Exploration Worksheet ( adapted from Alexander Sabitino, Picking Pythagorus.)
Directions for Starburst Exploration, Starburst triangles to measure pg 1,

starburst triangles to measure pg 2

My students will follow the directions on the Triangle Exploration worksheet and create triangles with the side lengths given on the cards in their envelopes. They will determine if the sides form a triangle, classify what type of angle is formed by the largest angle and if the area of the smaller sides cover the largest side.
Pythagorean Theorem Foldable
The next day we will make this foldable and place it into our INB'directions for Starburst activitys.
Click here for Pythagorean Theorem foldable template.
Interesting Lessons
Time for some interesting problems from Mrs. Hester's Classroom and Embrace the Drawing Board. Check their entire lessons on the link provided. I love these two lessons.
Lessons from Mrs. Hester's Pythagorean Theorem Lesson.
And here are some more wonderful INB pages from Mrs. Hester's Classroom.
Lesson Will the TV fit, from Tim's 3 act from Embrace the Drawing Board.
Pythagorean Triples
In the past, Pythagorean Triples have been one or two problems where the topic has been mentioned and not much more. I plan on spending a few day on triples this year.
OK, I don't have this foldable completely finished but thought I would give you a preview. Final foldable will be posted soon. Promise!
And here are some videos.
I love Robert Kaplinsky - Wizard of Oz, Pythagorean Theorem problem. See if you can find all the errors in the video before looking at his answers. I can't believe that so many of my students have never seen this movie. I may be dating myself but we watched it every Thanksgiving when we had only 4 channels to watch on TV. My how times have changed.
Some teachers would probably use this at the beginning of the unit, but I want my students to have lots of practice with Pythagorean Theorem before they see this video. I am going to use it at the end of the unit. They will have practiced many times and be able to verbalize or write down the errors they see.
And of course, Dan Meyer's 3 act, taco cart lesson. Check his site to see all 3 acts with questions and more. It is outstanding and the kids love guessing to see who will get to the taco cart first.
Distance Between Two Points
I'm excited to use Mary's lesson distance between 2 points at Curiouser and Curiouser. Read Mary's post to see the rest of the lesson. I'm hoping that the hallway outside my classroom is large enough for this. If not I will go to the main hall of the building. I like how the students will need to decide how to measure the sides. I've already started to think about how to group the students for this activity so they will be successful. Thanks Mary for posting this lesson.
I know that I will add to my plans throughout the unit. My lesson plans change depending on the students needs. Look for photos of students in my next post.
Til next time,
Jan
Monday, March 24, 2014
Pre-teaching before Pythagorean Theorem
The Pythagorean Theorem unit is going to be so much fun to teach this year. I have never had the time to go into this topic with the depth that I plan to this year. There are so many great activities it is hard to narrow it down. My Pre Algebra students need to review some of the prerequisites for this unit so I took the 1 1/2 before spring break to review some of these concepts.
1. Measuring and Classifying Angles
The students always love working with the protractors and after 4 long days of state testing it was exactly the type of activity they needed. We measured and drew angles adding these pages to our INB's. This foldable came about by accident. When I printed up the flash cards for perfect squares and square roots (see below) there were empty flashcards on the last page. I printed the flashcards on card stock and couldn't bear to not use it. In my mission to use scrap paper, I created this foldable. :)
.JPG)
I love utilizing materials that I have. In hindsight I may arrange these horizontally next year so they all fit onto one page.
2. Measuring and Classifying Triangles
We completed this foldable and practice sheet from 4mulaFun for our INB's. It was a good review of triangles for the kids and they are getting so much better with the cutting and pasting activities. I finally gave up on glue and have the students tape their foldables in their notebooks. They were a nightmare with the glue, it was everywhere and the tops would get clogged. I used glue sticks but they didn't last long at all. Tape is expensive so any ideas from my readers is appreciated.
3. Sum of the angles of a triangle.
I didn't really need to review this topic for Pythagorean Theorem but my students background is lacking so as long as we were talking about triangles and angles, I added this in for them. I can't believe I never saw this activity before to show the sum of the angles of a triangle equal 180 degrees. It takes no preparation on the part of the teacher and I used paper from my scrap basket. YES! I had the kids take scraps of paper and draw an acute triangle, right triangle and obtuse triangle. The size or angle measures were up to the kids to decide. Then they colored or marked all the angles of the triangles. I then had them rip the angles and reassemble them to form a straight line. So easy and a great visual for them. It took a few tries to get the angles lined up so it is like a puzzle. They loved it.
Yes, I know the top triangle isn't lined up in a straight line. Funny none of the kids caught that! Not to worry, I will fix it.
4. Creating a geometry star
It was the day before spring break and nobody wanted to be at school. There was an assembly and the classes were shortened to 36 minutes and the kids were, you know, a bit excited. What to do? Since we were studying triangles we did this quick project. Most of the kids finished in the 36 minutes and they were busy the entire time, calm and happy. Isn't that the way it should be before break? Again, I like this because all that was needed was paper, pencil, ruler and colored pencils. Easy. And it gets better, it is free on teachers pay teacher from Virtually Montessori. After break I will post some of the pictures the students created.

5. Square numbers and square roots.
We are making flash cards to memorize perfect squares and square roots. You can go to kitzkitz to make your own flashcards to print. We will cut the flash cards and then put them into envelopes in our INB's. This idea is from Mrs. Hester's Classroom. I only had the kids do the perfect squares for this lesson. They learned this very early in the year but now I have them memorize the squares through 25. The envelope to make the pocket is from homeschoolshare. They have a fantastic collection of templates you can use that are free. They also have templates for foldables that you can type on and print up. Check them out, they are a great resource.
Here is the link to the flash cards for perfect squares and square roots (make sure to download the document to see square roots as well.) The originals are large and good for a math center but they use seven pages of paper. When I printed the individual flash cards for the students, I printed 4 pages on one page. That way I only used two pieces of paper per student. I'm always trying to save paper when possible.
1. Measuring and Classifying Angles
The students always love working with the protractors and after 4 long days of state testing it was exactly the type of activity they needed. We measured and drew angles adding these pages to our INB's. This foldable came about by accident. When I printed up the flash cards for perfect squares and square roots (see below) there were empty flashcards on the last page. I printed the flashcards on card stock and couldn't bear to not use it. In my mission to use scrap paper, I created this foldable. :)
.JPG) |
| The students used protractors to draw their own angles where the green post it is. |
.JPG) |
2. Measuring and Classifying Triangles
We completed this foldable and practice sheet from 4mulaFun for our INB's. It was a good review of triangles for the kids and they are getting so much better with the cutting and pasting activities. I finally gave up on glue and have the students tape their foldables in their notebooks. They were a nightmare with the glue, it was everywhere and the tops would get clogged. I used glue sticks but they didn't last long at all. Tape is expensive so any ideas from my readers is appreciated.
I didn't really need to review this topic for Pythagorean Theorem but my students background is lacking so as long as we were talking about triangles and angles, I added this in for them. I can't believe I never saw this activity before to show the sum of the angles of a triangle equal 180 degrees. It takes no preparation on the part of the teacher and I used paper from my scrap basket. YES! I had the kids take scraps of paper and draw an acute triangle, right triangle and obtuse triangle. The size or angle measures were up to the kids to decide. Then they colored or marked all the angles of the triangles. I then had them rip the angles and reassemble them to form a straight line. So easy and a great visual for them. It took a few tries to get the angles lined up so it is like a puzzle. They loved it.
 |
| Tear the triangles into three pieces. Then assemble to form a straight line. |
 |
| A great visual for showing the sum of angles of a triangle. |
4. Creating a geometry star
It was the day before spring break and nobody wanted to be at school. There was an assembly and the classes were shortened to 36 minutes and the kids were, you know, a bit excited. What to do? Since we were studying triangles we did this quick project. Most of the kids finished in the 36 minutes and they were busy the entire time, calm and happy. Isn't that the way it should be before break? Again, I like this because all that was needed was paper, pencil, ruler and colored pencils. Easy. And it gets better, it is free on teachers pay teacher from Virtually Montessori. After break I will post some of the pictures the students created.
5. Square numbers and square roots.
.JPG) |
Here is the link to the flash cards for perfect squares and square roots (make sure to download the document to see square roots as well.) The originals are large and good for a math center but they use seven pages of paper. When I printed the individual flash cards for the students, I printed 4 pages on one page. That way I only used two pieces of paper per student. I'm always trying to save paper when possible.
 |
| I gave the students the smaller version of the flashcards and they fit in the pocket nicely. You could also have two pockets instead of just one. |
I hope there is something here that is new that you will be able to use. One thing I am noticing with Common Core is that everyone is teaching the same topic at the same time so there is so much available for us to use with the kids. It is amazing. I am finishing up my Pythagorean Theorem unit and hope to post it by the end of the week.
Until next time,
Jan
Friday, March 21, 2014
Blueprint lesson #3
Here are some pictures of the kids at work. It turned out to be a good experience for them even though it wasn't what I expected it to be. Making it more focused will help.
 |
| This group of boys were very engaged. |
 |
| Hmmm. Interesting picture. |
 |
| So here they are trying to figure out how to read all of the information on the drawings. |
 |
| This group tried hard to come up with some good questions. |
Til next time,
Jan
Subscribe to:
Posts (Atom)
